Friday, 3 February 2017

Healthy Breakfast Ideas 

Choosing a healthy breakfast option can be a challenge and here in North America we have been conditioned to think we need a specific breakfast food- which often resembles dessert more than a balanced meal. So here are some ideas for healthier options. What you'll notice is that each has it's strengths and weaknesses when it comes to nutritional value, which is why food combining is so important (more on that at the end).

Banana Pancakes

Banana Protein Pancakes
Ingredients 
  • 1 1/2 ripe banana
  • 2 free run eggs
  • pinch of baking powder
Directions 

Take 1 ripe banana and mash it in a bowl. 
Crack in 2 eggs and a dash of baking powder. 
Mix together and pour into a warm frying pan with melted coconut oil

Additions 
  • Add spices like cinnamon, cardamon, nutmeg etc 
  • Add warmed Ontario Blueberries as a topper
  • Add ground chai seeds or ground flax seed to batter to increase fiber and thickness of pancake 
  • Add a scoop of your favourite protein powder to increase the protein and balance the carbohydrates from the bananas
  • Add nut butter to increase the fat and serve with eggs or a turkey breakfast sausage to increase the protein and fat.

Carbohydrate
22g
Fiber
2g
Sugar
12g
Fat
5g
Protein
7g


Turkey Breakfast Sausage

  •      1 pound ground turkey
  •      2 teaspoons fresh sage
  •      1 teaspoon fresh rosemary
  •      1 teaspoon fresh thyme
  •      ½ teaspoon garlic powder
  •      ½ teaspoon cinnamon
  •      1 teaspoon sea salt
  •         2 tablespoons coconut oil


1.     Combine all ingredients except the oil and refrigerate for at least 30 minutes, overnight preferred.
2.     Add the oil and shape into four patties. Cook in a lightly oiled skillet over medium heat, about five minutes per side or until no longer pink in the middle. Alternatively, bake at 400F for 25 minutes. Serve hot.

Based on Recipe making 6 sausages, 1 sausage= 1 serving

Carbohydrate
1g
Fiber
0g
Sugar
0g
Fat
16g
Protein
23g

 
Egg Muffins

Pictured in my daughter's lunchbox since they
also make GREAT lunch options
  •        1 tsp Salt
  •     1/2 tsp Coconut Oil, Organic
  •        1 cup Broccoli, chopped
  •        1/2 Onion, chopped
  •        1/4 whole Green Bell Peppers, chopped
  •        1/4 whole Red Bell Pepper, chopped
  •        1 tsp Black Pepper
  •        8 Eggs, Pastured

1.     Preheat oven to 400°F. Grease the muffin tin with coconut oil.
2.     Rinse and chop all vegetables into 1/4-inch pieces. *Any vegetables can be used!
3.     Divide vegetables evenly between muffin tins.
4.     Whisk the eggs, then pour into the tins, dividing it evenly.
5.     Sprinkle with salt and pepper, then stir the vegetable and egg mixture briefly to evenly disperse the vegetables throughout the egg.
6.     Bake the egg muffins in the oven for 18–20 minutes.

Based on 1 egg muffin (recipe makes 8)

Carbohydrate
2g
Fiber
1g
Sugar
1g
Fat
5g
Protein
7g

Why Food Combining Is Key

What you may notice about all these recipes is- their nutritional breakdowns are not perfect. They are not perfectly balanced. Knowing, *roughly* what nutrition foods provide helps you to create a meal that's balanced. The banana pancakes are higher in carbohydrates (thanks to the bananas), while the egg muffins are high in fat and protein. By combining these two items you can create a very healthy and more balanced meal.

Combined Meal: 

2 Egg Muffins
1 Serving Banana Pancakes
1 tbsp almond butter

Carbohydrate
30g
Fiber
5g
Sugar
16g
Fat
24g
Protein
25g


Disclaimer: The information contained in these topics is not intended nor implied to be a substitute for professional medical advice, it is provided for educational purposes only. This information shouldn’t take the place of seeing a Naturopathic Doctor or your primary care provider for individualized health recommendations.

Tuesday, 31 January 2017

MASSAGE AND RUNNING

WHAT IS HAPPENING TO MY MUSCLES?
Running requires your muscles to repetitively contract and relax, the greater the contraction the greater the force generated and the more muscle fibres involved. Whether you are increasing your speed, distance or changing your running terrain your muscles need to adapt. To adapt the muscle fibres need to tear. When micro-tearing (small tearing) occurs your body lays down scare tissue at the tear site. Scare tissue can also occur in cases of acute trauma, such as a strain, sprain or pulled muscle. Regardless of the method, the body must go through a healing cycle. If the cycle is interrupted (by another run or a cross training work out) before completion, your body has not completely healed and these micro-tears in your muscle fibres will tear again. The tears will occur at the previous scar tissue site as it is vulnerable and not as elastic as healthy muscle fibres. Often you do not realize scar tissue is building up until it is too late and the pain begins. This can translate into surrounding muscle fibres and surrounding muscles shortening or tightening to ‘protect’ the scar tissue/ injured area. The scar tissue build up, or knot, can impact the muscle’s range of motion, decrease circulation, irritate nerve roots and decrease strength. This can potentially cause compensation, which will change your running gait, and put additional strain on surrounding muscles.


scar-tissue


http://ridgwaychiropractic.com/tag/scar-tissue/ 

COMPENSATION PATTERNS
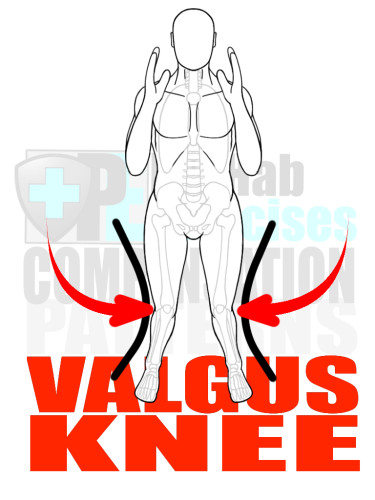
A compensation pattern is the body’s attempt to make up for the lack of movement in one area by adding a new movement to another area. More specifically, a compensation pattern is the body’s way of using a new firing sequence or utilizing structural reliance to supplement or avoid another firing sequence or structural reliance that is not working properly. Many compensation patterns are subtle or hardly noticeable and grow over time to a larger scaled compensation, this can occur through different types of exercise or poor postural habits.
Having the ability to recognize patterns of compensation will provide you with the opportunity to correct and neutralize the associated risk and damage.
For more information on different compensation patterns visit http://www.prehabexercises.com/compensation-patterns/.

  PreHab Exercise eBook - Alignment - Compensation Patterns - Valgus Knee with Direction Lines


http://www.runningwritings.com/2012/02/injury-series-biomechanical-solutions.html     http://www.prehabexercises.com/compensation-patterns/

MASSAGE THERAPY AND RUNNING ARE A PERFECT MATCH AND HERE IS WHY...
Therapeutic massage targets the injured area(s) to break down the scar tissue build up and release tight muscles (which can compress circulation, compress nerves, or decrease range of motion). These effects are significant for everyone, however particularly important for a runner who is looking for an injury free season, a speedy recovery and/or improved performance.
Massage is ideally a preventative program. Massage can reduce compensation patterns from becoming an increasing problem, or one that will be very difficult to reverse. If a runner waits until pain sets in, the recovery time increases. This is because there is an increasing amount of scar tissue build up and there is increased stress on surrounding muscles and tissues. A proactive athlete, who incorporates massage as a maintenance program, will catch tightness and scar tissue before it becomes an issue and addresses the area before it becomes a problem.
When your muscles are healthy they will work at optimal capacity. When you can move properly you will run more efficiently.

WHEN SHOULD I SCHEDULE A MASSAGE?
You should schedule your massage approximately once a month, or once every few weeks, depending on your running goals and budget. Take into consideration if you are increasing your training in any way. The change in training results in the change in your muscle composition. Therefore, as your training increases your duration between massage treatments should decrease. If possible, book your massage on your rest day. With deep massage you may feel like you just had a work out afterwards. You need time to recover from a massage just like you do from a work out.
If you are competing, a post-race massage is ideally done approximately 3 days after the race. This allows your body to begin the inflammatory phase of the healing process before you go for a massage. Initially after the race you would want to focus on icing, increase fluid intake, resting, gentle rolling and stretching. Around the 3rd day, your massage therapist can get a little deeper and more specifically on stubborn areas without the acute sensitivity you may experience right after the race. Massage is a good way to ‘clean up’ the muscles by removing any initial scar tissue and relaxing tightened muscle segments.

Wednesday, 11 January 2017

Tasty Water Recipes to Stay Hydrated During the Winter Months


With the cold winter months now upon us and heaters in homes, offices and cars running at full blast, some of you may be noticing anything from 'dry, winter skin' to more headaches: these are signs of dehydration! If your New Year's resolution was to drink more water or you just need a gentle nudge to 'up' your water intake, we're here to help. 

Most of us have heard the classic '8 glasses of water a day', but do you really know why? Fluid helps you stay healthy and energized. It also:
  • controls your body temperature
  • aids digestion
  • carries nutrients around your body
  • cushions organs and joints
  • gets rid of waste
  • keeps your bowels regular
Your body loses water by sweating, breathing and getting rid of waste (urine and stool). If you lose more fluid than you take in you can get dehydrated.

Signs and symptoms of mild hydration include:
  • thirst
  • dry lips and mouth
  • flushed skin
  • tiredness
  • irritability
  • headache
  • dizziness
  • fainting
  • low blood pressure
  • increase in heart rate
  • dark, strong smelling urine
Signs of severe dehydration include:

  • blue lips
  • blotchy skin
  • confusion
  • lack of energy
  • cold hands and feet
  • rapid breathing
  • high fever
  • unconsciousness
How Much is Enough? 

How much fluid you need every day depends on your age, sex and activity level.  Hot and humid weather can increase your needs.

According to the The Dieticians of Canada to keep your body hydrated, aim for a fluid intake of about:

  • 3 L (12 cups) for men 19 years old and over each day
  • 2.2 L (9 cups) for women 19 years old and over each day.
This sounds like a lot but remember this is cups NOT glasses like we have all heard before. Water is one of the best fluid choices. Herbal teas are fine as long as there is no added sugar i.e. brew your own tea and drink it, don't buy pre-bought options.

Follow these tips to stay hydrated:
  • Drink a glass of water when you wake up each morning or before you go to bed.
  • Keep a fresh glass of water by your desk or on hand where you work.
  • Carry a container of water with you throughout the day.
  • Drink a glass of water before eating your meals (ensure you don't drink too much as this can dilute your stomach acid and digestive enzymes).
  • Make sure you have a drink with each meal such as a glass of low fat milk, soy beverage or water.
  • Don’t ignore thirst. Drink water or another healthy drink when you feel thirsty. 

Keeping Water Healthy and FUN!

The next thing we hear a lot is "Water is SO boring" or "I hate the taste of water" and unfortunately some companies out there have taken advantage of this by marketing and selling water additives such as powders and liquid flavourings but beware: these are filled with numerous chemicals like aspartame and are chock full of sugar! These essentially negate any positives the water is doing for you and can actually be detrimental by causing a "sugar crash".

Keep it simple. Think of flavor combos you like in other recipes and build from there. Here are some ideas to get you started:
  • Cucumber + lime + strawberry + mint
  • Lemon + raspberry + rosemary
  • Orange + blueberry + basil
  • Lime + ginger root + basil
  • Watermelon + honeydew + mint
  • Cucumber + mint + jalapeno
  • Lemon + thyme
  • Orange + hibiscus + star anise
  • Orange + cinnamon + cardamom + cloves
  • Pear + fennel
Below is a GREAT chart of combinations to help keep your taste buds happy and your system hydrated which we utilize at the clinic ourselves:


Choose organic ingredients when you can. Wash produce and rinse herbs to remove chemicals, pesticides, and other residues.


The Vessel

Glass, plain and simple. Tune in to our social media (Facebook, Instagram and Twitter) tomorrow for a great read from our naturopathic doctor Jessica Gurske on why your new year should be plastic and BPH free! 

Stay hydrated my friends! 


Friday, 6 January 2017

Homemade Anti-Bacterial Mouthwash

Need a quick and simple mouthwash? Tired of your mouth burning when you rinse your teeth? Homemade mouth wash is the answer for you!


This homemade anti-bacterial mouthwash helps to cleanse and freshen the breath while naturally killing germs and alkalizing the mouth! With these few simple ingredients you can make your own mouthwash in seconds and it's chemical free:

  • Baking Soda: Helps to neutralize acids, eliminate odours causing bad breath, and fight germs, it may even help reduce stains on teeth. Can be purchased from any grocery store.

  • Essential Oils: Peppermint oil gives you with that cool, minty flavour and Tea Tree oil has beneficial cleaning properties. Both of these oils are anti-bacterial to help knock out bad breath. Can be purchased from many grocery stores or any health food store.


  • Xylitol: Prevents bacteria from sticking to teeth which reduces plaque build-up, lowers the acidity in the mouth and helps to repair enamel. Also provides a little sweetness to the mix. Can be purchased from some grocery stores or in smaller quantities from Bulk Barn.

Ingredients
  • Glass container
  • 1 cup filtered water
  • 2 tsp baking soda
  • 2 tsp xylitol
  • 5-10 drops each of peppermint and tea tree essential oils (depending on your taste preference, start with less and adjust as needed)
Instructions
  • Use a funnel to add the dry ingredients and then the wet ingredients to your container. Shake a few times to ensure everything has dissolved. Use both morning and night after brushing and flossing by taking a sip and swishing around your mouth for 15-30 seconds. As with any mouthwash, don't swallow! Voila, you have your own homemade mouthwash without any added chemicals!


~The Coach House Team~